Friday, January 22, 2016

Workbench – Native RaspberryPi WebApp – Dev #3

A short update to the close of the WorkBench prototype project. The final dashboard has been completed with all end goals accomplished.

The final dashboard displaying time, tasks, weather (5-day forecast).

Lessons learned in dealing with this project:
  • Python with PySide, specifically using QWebView does not support all of CSS3 commands or links to external typeface packages. Easiest way to work around this is to house everything locally within the python project.
  • I have a stronger understanding using third-party APIs and integrating into python and javascript.
  • Using simpeweatherjs for the framework behind the weather system heavily relies upon YAHOO services and their APIs not changing. I ran into a case where I needed to omit certain functions within the simpleweatherjs scripts to get data from YAHOO without returning a null value.
  • I have a better understanding of information hierarchy based on what data is deemed to be more important based off of how we associate purely visual data (weather) and interactive data (tasks) for user interaction.

Saturday, January 16, 2016

Workbench – Native RaspberryPi WebApp – Dev #2

Last time I introduced the application concept, and showed some of the initial progress that has been made toward WorkBench. After working off-and-on I have finally created all content to be showcased in their placeholder positions.


I have implemented google calendar's agenda and a locally hosted To-Do list in addition to the already implemented Date and Weather modules, all in their temporary positions. It won't look pretty for a while. My main focus is to be sure that all modules function as intended and display the information most needed for the user operation.

Tuesday, January 12, 2016

Workbench – Native RaspberryPi WebApp – Dev

Over the past few weeks I have started to develop an at-home helper that has been actively been named Workbench. For development I am using Python with PySide, HTML, JavaScript, and PHP.

This application is being created with the intent to be used in pairing with the Raspberry Pi and any format of LCD screen. Its core features that are based in four components as followed:
  • Current Date and Time
  • Weather including five-day forecast and current conditions.
  • Event view based on data collected from Google Calendar.
  • To-Do/Reminder list that can be integrated and asynchronously between the web app and mobile device. 
As of today, I have created a user login system that will eventually tie into the appropriate Google user account services to access data from Google Calendar, Tasks, or a similar third-party management system.


The date/time, weather components are now actively sending and receiving data respective to the users location and actively displaying in their placeholder locations.


What is next:
  • Integrate the five-day weather forecast and appropriate icons based off of the weather codes returned from weather API call.
  • Integration of base calendar component in list form.
  • R&D for task/to-do system to be used on mobile device and how to parse information between platforms.

Wednesday, October 28, 2015

Unreal Engine 4 Quick Trick: Wheeled Vehicle Air Control


In R0V3R, I was looking to create mid-air vehicle control similar to Grand Theft Auto V. This means having the ability to control the pitch and roll of the vehicle when vehicle is no longer grounded.

In Unreal Engine 4, we can accomplish just that with a few simple steps!

The complete AirControl function created within Rover's player blueprint (Wheeled Vehicle).

First off, I created an new input event bound to my controller's left joystick Y+/- value and used my existing X+/- value (used for turning) as the driving force of the AirControl function.

 
Using the Axis Value to control Pitch and Rotation inputs.


From there the first thing we need to check is to see if the Actor is grounded or not. The easiest way was to detect if a raycast with a specified length at the root of the actor was penetrating an object along the -Z axis. To accomplish this, we gathered the Actor location via GetActorLocation. The start point of the ray is at the location, but in order to get the end point we needed to offset the Z value. By using Break Vector we are able to use a subtraction node with the desired length of the ray to be cast from the Z value of the actor location. By passing X and Y across and creating a new Z value, we can rebuild the new vector using Make Vector and plug it into the End input. Be sure to enable Ignore Self. 

The isGrounded sequence. Be sure to enable Ignore Self. Outputs a Boolean.
The hardest part is done. Now we need to set up how we are going to parse the raw values from our controller input into appropriate angular velocity to add to the Vehicle Movement>Updated Primitive.

Using the Relative Transform of the Vehicle Movement component we can create a new Direction Vector.
The last step is the most important. We use the Get Relative Transform node to return a transform value of the Vehicle Movement>Updated Primitive. Passing the return value to Transform Direction node, we utilize our raw controller input with a multiplier dictate the new angular velocity. We use the multipliers to adjust speed and if inputs are to be inverted by using a +/- value. This then gets plugged into Set Physics Angular Velocity > New Ang Vel Input which creates the additional force to control the actor in mid air. Be sure to set Add to Current as True because we want to add to the existing value. 

We use the Boolean return value from LineTraceByChannel to control weather we enable the ability to move the actor in mid air. By this we know that IF the actor is NOT grounded we can then Set Physics Angular Velocity.

IF actor is NOT grounded (false) we can use Air Control to manipulate actor mid-air.

In short we accomplished the following:
  • Detecting if Actor is grounded or not.
  • Created a new Angular Velocity with Raw Input and Transformed Direction into a new Vector.
  • Set an Additive Angular Velocity to control the actor while in mid-air.

Friday, October 16, 2015

Automation is Important For Everyone


Just as it was in the automotive industry the introduction of automated production lines carved the way to creating industrial efficiency. For artists, it's no different. Every task you do takes up time. When you find yourself repeating countless processes, more than likely there is a way to automate yourself out of it. I myself found tedious tasks would eat up a lot of my production time. Even creating a wall where I knew I had to position myself differently to ensure that I would complete a task on time.

A while back I was given the opportunity to create a workflow to replicate assets from our current generation pipeline to last generation. This would allow our team to focus on higher priority items and tasks and much more fun things. This process included creating new level of detail (LOD) models that fit within our specifications, combining UVs into one 0-to-1 UV texture conforming to texel density, transferring the high quality textures over to the last generation with modifications to work with the older shader model, and finishing up with the final processing steps to have a working game asset.

This new process to complete by hand took nearly six hours effectively cutting time from creating assets from scratch that took upwards of a week plus to complete. The importance of working by hand was to find the best techniques for efficiency and process to work with a wide variety of assets, not just one specific type. It is nice to have a quick solution for one thing, but when you can apply to all it becomes an exciting endeavor.
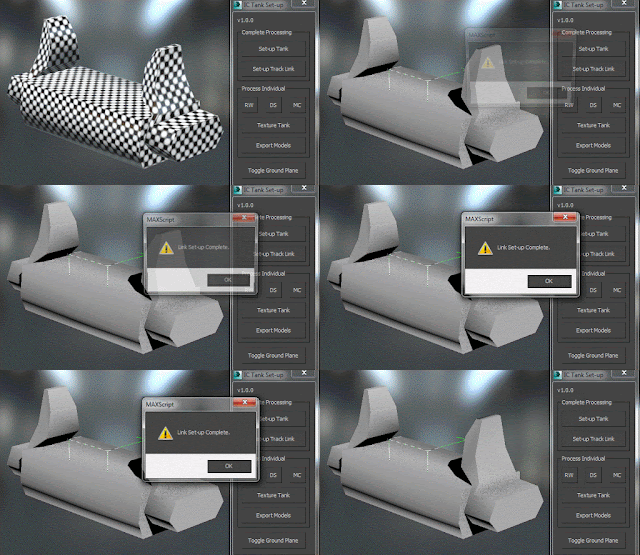
A 'one-off' processes that automates the set up of a link.
The new process was left on the back-burner to let it set and iterate new improvements as we go through our daily tasks. Time and time again, there would be small portions where one of our team would come across a 'quick trick' that we would end up cutting the time to do that task drastically. This began my initial break into automating some of these processes.

I've done some work previously with automation within a production environment, so I had a jump start into scripting tools and having a common understanding of how things should work. I began cutting one of our largest processing tasks that took nearly thirty to forty-five minutes down to less than five seconds. This was huge. Huge in the sense that we were enabled to push more content into the game at a faster rate allowing more time for polish and new content all without having the stress of time on our shoulders. As a team we continued to simplify as many processes as we could. Our tech artist would implement these new one-off tools into our internal toolset so that it would be made available to all artists. After a good amount of time has passed we are able to process nearly 90% of the workflow at the click of a few buttons shaving off months of work (estimated).

This is just one example of many. Automation can go in any direction, improve pipelines whether it is front-end or back-end. At times it could be the simple things or the elaborate. However, automation is not for every task. If the process is small and does not yield a large quantity, its more than likely not reasonable to automate. Sometimes you can do things faster by hand than you can with automating or using a tool to help a process.

In short, Automation is important and it pays off not only for you but your whole team by doing the following:
  • Eliminates human error.
  • Increase in accuracy in repetition.
  • Removes most or all the busy boring work, freeing the team time to do more important things.
  • Higher volume production.
  • Significant cost savings of production.

Wednesday, December 10, 2014

Reflections in Water/Puddles based on Camera Pixel Depth


Water Reflections based on Camera Pixel depth. (Unreal 4)

One thing that has bothered me in some video games is the way the water reflection is treated based off the the player camera. In most instances it is treated correctly, but in some cases the water is too much like a mirror at all distances, close up and far away. 


In reality when we approach a puddle or a body of water the reflectiveness of the water is still there but we are able to see down into what is beneath. (seen in previous images). However, in some games reflections are over the top:


A lot of detail is lost in the street below, though it still is acceptable I wanted to devise a way to assist in the way that reflections are controlled close up in materials.

For this example I am using Unreal Engine 4.


Based on the Pixel Depth of the player Camera:

The pixel depth node is divided by a Constant Parameter I called 'camera depth' which divides the input from pixel depth node to adjust the range of falloff between two values "Min Puddle Roughness" and "Max Puddle Roughness." This value is then added to the overall roughness texture using a mask and plugged directly into the roughness slot in the material editor.

Camera Depth set to 96.0
Camera Depth set to 256.0
As you can see the lower the value the more the player will see the mirror-like reflection in game, but as we push that value further out the player will only see the mirror-like reflection in the distance.

Camera Depth set to 135.0

Gradient: Camera Depth set to 135.0
So in finding a happy-medium, you can still have great results without losing too much in the close-up reflections. You can get into more detail using calculations from light vectors that way depending on the angle at which you are looking at the reflection, values would adjust.